

How To Set Up Hp Laptop
Z7_3054ICK0KGTE30AQO5O3KA30N0
hp-concentra-wrapper-portlet
![]() Actions
Actions
HP Notebook PCs - Setting Up Windows x for the First Time
This document is for HP notebook computers with Windows x.
This document contains information about setting upward your notebook and configuring Windows 10 for the get-go time. To set up upward your new computer, unpack the computer, turn information technology on, and and then complete the Windows 10 setup process.
Pace 1: Unpacking the notebook
Unpack the laptop and other items from the box.
-
Unpack the notebook from the box.

-
Unpack the other items from the box.
-
Select a location for the notebook that is near a power source.
-
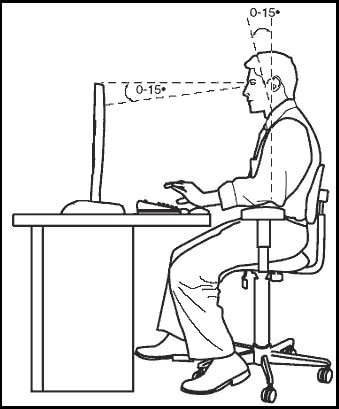
Adapt the brandish screen.
-
Adjust the top of the screen then the entire viewing area is just below your middle height. The height and bending of the screen should non cause neck or dorsum hurting during prolonged viewing.
-
Accommodate the distance of the screen then your eyes are at least one meter (three anxiety) away and but slightly angled down.
annotation:
Nigh notebooks are smaller than typical monitors and might need a stand up or small platform to raise it to the height and angle described to a higher place.
-
Step 2: Connecting the AC adapter to the notebook
Follow these steps to connect the Ac adapter to the notebook and to a wall outlet.

-
Plug the AC adapter directly into a functioning wall outlet. Do non plug into a power strip, surge protector, or secondary ability source.
-
Verify the LED on the Air conditioning adapter is illuminated when plugged into an AC wall outlet.
notation:
Some AC ability adapters do non have an LED.
-
Connect the other cease of the Air conditioning adapter to the computer.
note:
Cables can be unsightly and should be hidden from view by routing them behind the back of the desk or betwixt the desk-bound and a wall.
Footstep 3: Connecting the mouse to the notebook
Choose a section based on whether you accept a wired or wireless mouse.
Connecting the wired mouse
Plug the USB cable for the mouse into a USB port on the notebook.
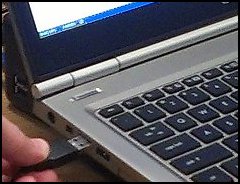
note:If available, apply the USB ports on the back of the laptop; this allows yous to plug USB drives into the USB ports on the sides of the laptop.
Connecting the wireless mouse
Follow these steps to connect the wireless mouse to the notebook.
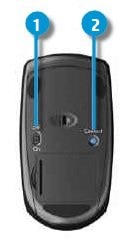
On / Off switch Connect button
-
Remove the tab from the bombardment compartment on the bottom of the mouse.
-
If the wireless mouse comes with an external dongle, plug the dongle into a USB port on the notebook.

note:
If available, use the USB ports on the dorsum of the laptop; this allows you lot to plug USB drives into the USB ports on the sides of the laptop.
-
Make sure the mouse is within 100 cm (39 in) of the notebook and on the same level surface.
-
Make sure the power switch for the mouse is gear up to the On position.
Step 4: Setting upwards Windows ten
Configure your preferences, connect to the Net, and get started using the operating organization.
annotation:The personal digital banana Cortana guides you lot through the process of setting upward Windows 10, with the choice of using vocalisation control instead of using your mouse to progress through setup. To adjust Cortana's volume, use the book control icon
at the lesser right corner of the screen. To disable vocalisation control and mute Cortana, click the microphone icon
at the bottom of the screen.
-
Press the power button to plough on the reckoner. During the setup process, Windows 10 might take a long fourth dimension to procedure an item without visual feedback on the screen to indicate progress. This is normal.
caution:
To avoid dissentious the data on the estimator, do non restart your reckoner during the setup process.
-
After the HP logo, the Allow'southward first with region. Is this correct? screen displays. Select your country or region from the list, and then click Yes.
-
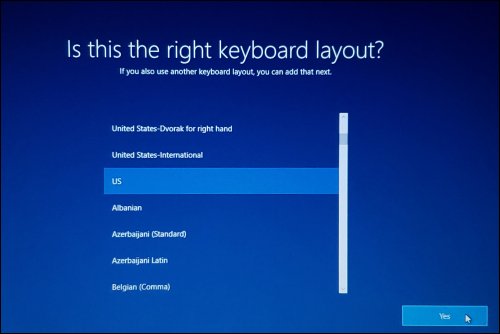
The Is this the correct keyboard layout? screen displays. Select the desired keyboard layout, so click Yep.
-
On the Do you desire to add together a second keyboard layout? screen, you can either follow the instructions for calculation some other keyboard layout or click Skip.
-
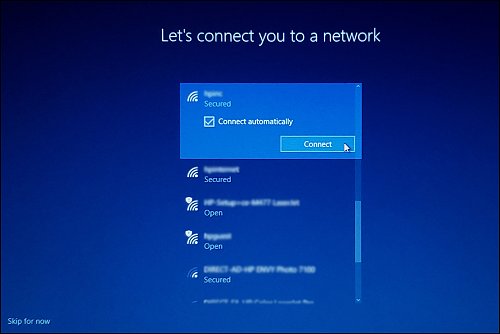
On the Let'south connect you to a network screen, select from the available networks, type in your user name and password if necessary, and so click Connect.
-
After a few introductory setup screens that require no activity, the Windows 10 License Agreement screen displays. After reading the license agreement, to proceed, click Accept to continue.

-
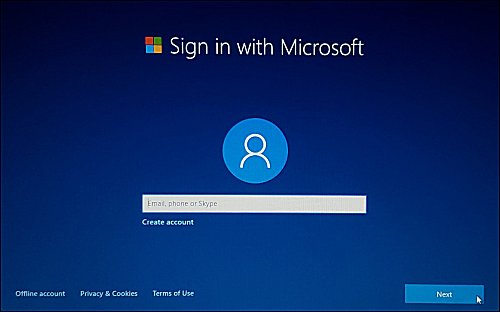
After the license agreement, the Sign in with Microsoft screen displays. Sign in with your Microsoft business relationship or click Create account and follow the prompts to create a new Microsoft business relationship.
-
After signing in, the post-obit setup screens display. Follow the on-screen instructions to customize Windows.
-
Link your Android or iPhone to this PC
-
Protect your files with OneDrive
-
Set up up your Role
-
Brand Cortana your personal assistant?
-
Do more than beyond devices with activity history
-
Choose privacy settings for your device
-
-
On the registration screen, blazon your personal information, and then click Side by side.

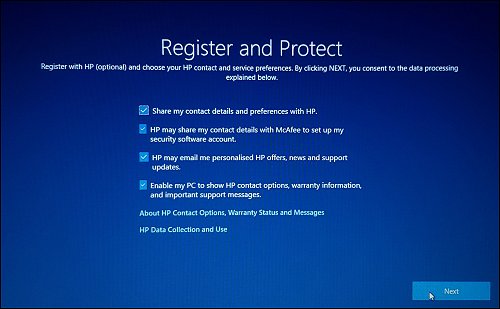
On the Register and Protect screen, select your preferred privacy settings, and and so click Next.
-
Read whatsoever introductory screens describing the features of your computer, make selections when prompted, and then click Next up on completing each.
Y'all are now washed with the initial setup process.
Step v: Changing the Engagement and Fourth dimension settings
Adjust the date and time on your figurer.
-
In the lesser-correct corner of the screen, find the date and time.

-
If the date and time are incorrect, continue with these instructions.
-
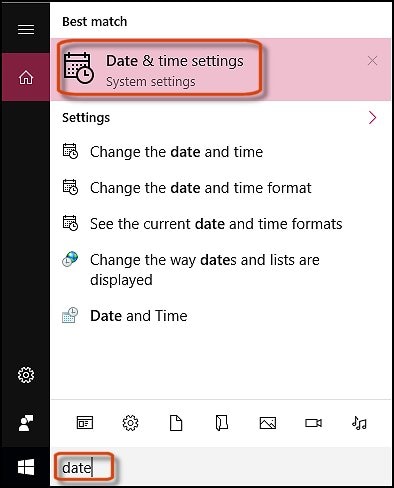
To change the date and time, in Windows search for Date. In the results, click Engagement & time settings.
-
Motility the Set time automatically slider to Off. Then, nether Alter date and time, click Change.
annotation:
By default, the Set time automatically slider is set to On. If the computer is non connected to the Internet, the date and time might be incorrect.

-
Arrange the appointment and fourth dimension as needed, then click Modify.

-
If the computer is connected to the Internet, motion the Set time automatically slider to On.

Stride half dozen: Things to practise after setup
Congratulations! You take successfully prepare upwards Windows 10. HP recommends you open HP Back up Assistant and scan for updates.
HP Support Assistant scans your reckoner and automatically detects and installs the latest software and drivers available from HP. For more information on how to download and utilize HP Back up Banana, see Using HP Support Assistant (Windows 10, viii, 7).
Source: https://support.hp.com/id-en/document/c04936024
0 Response to "How To Set Up Hp Laptop"
Post a Comment